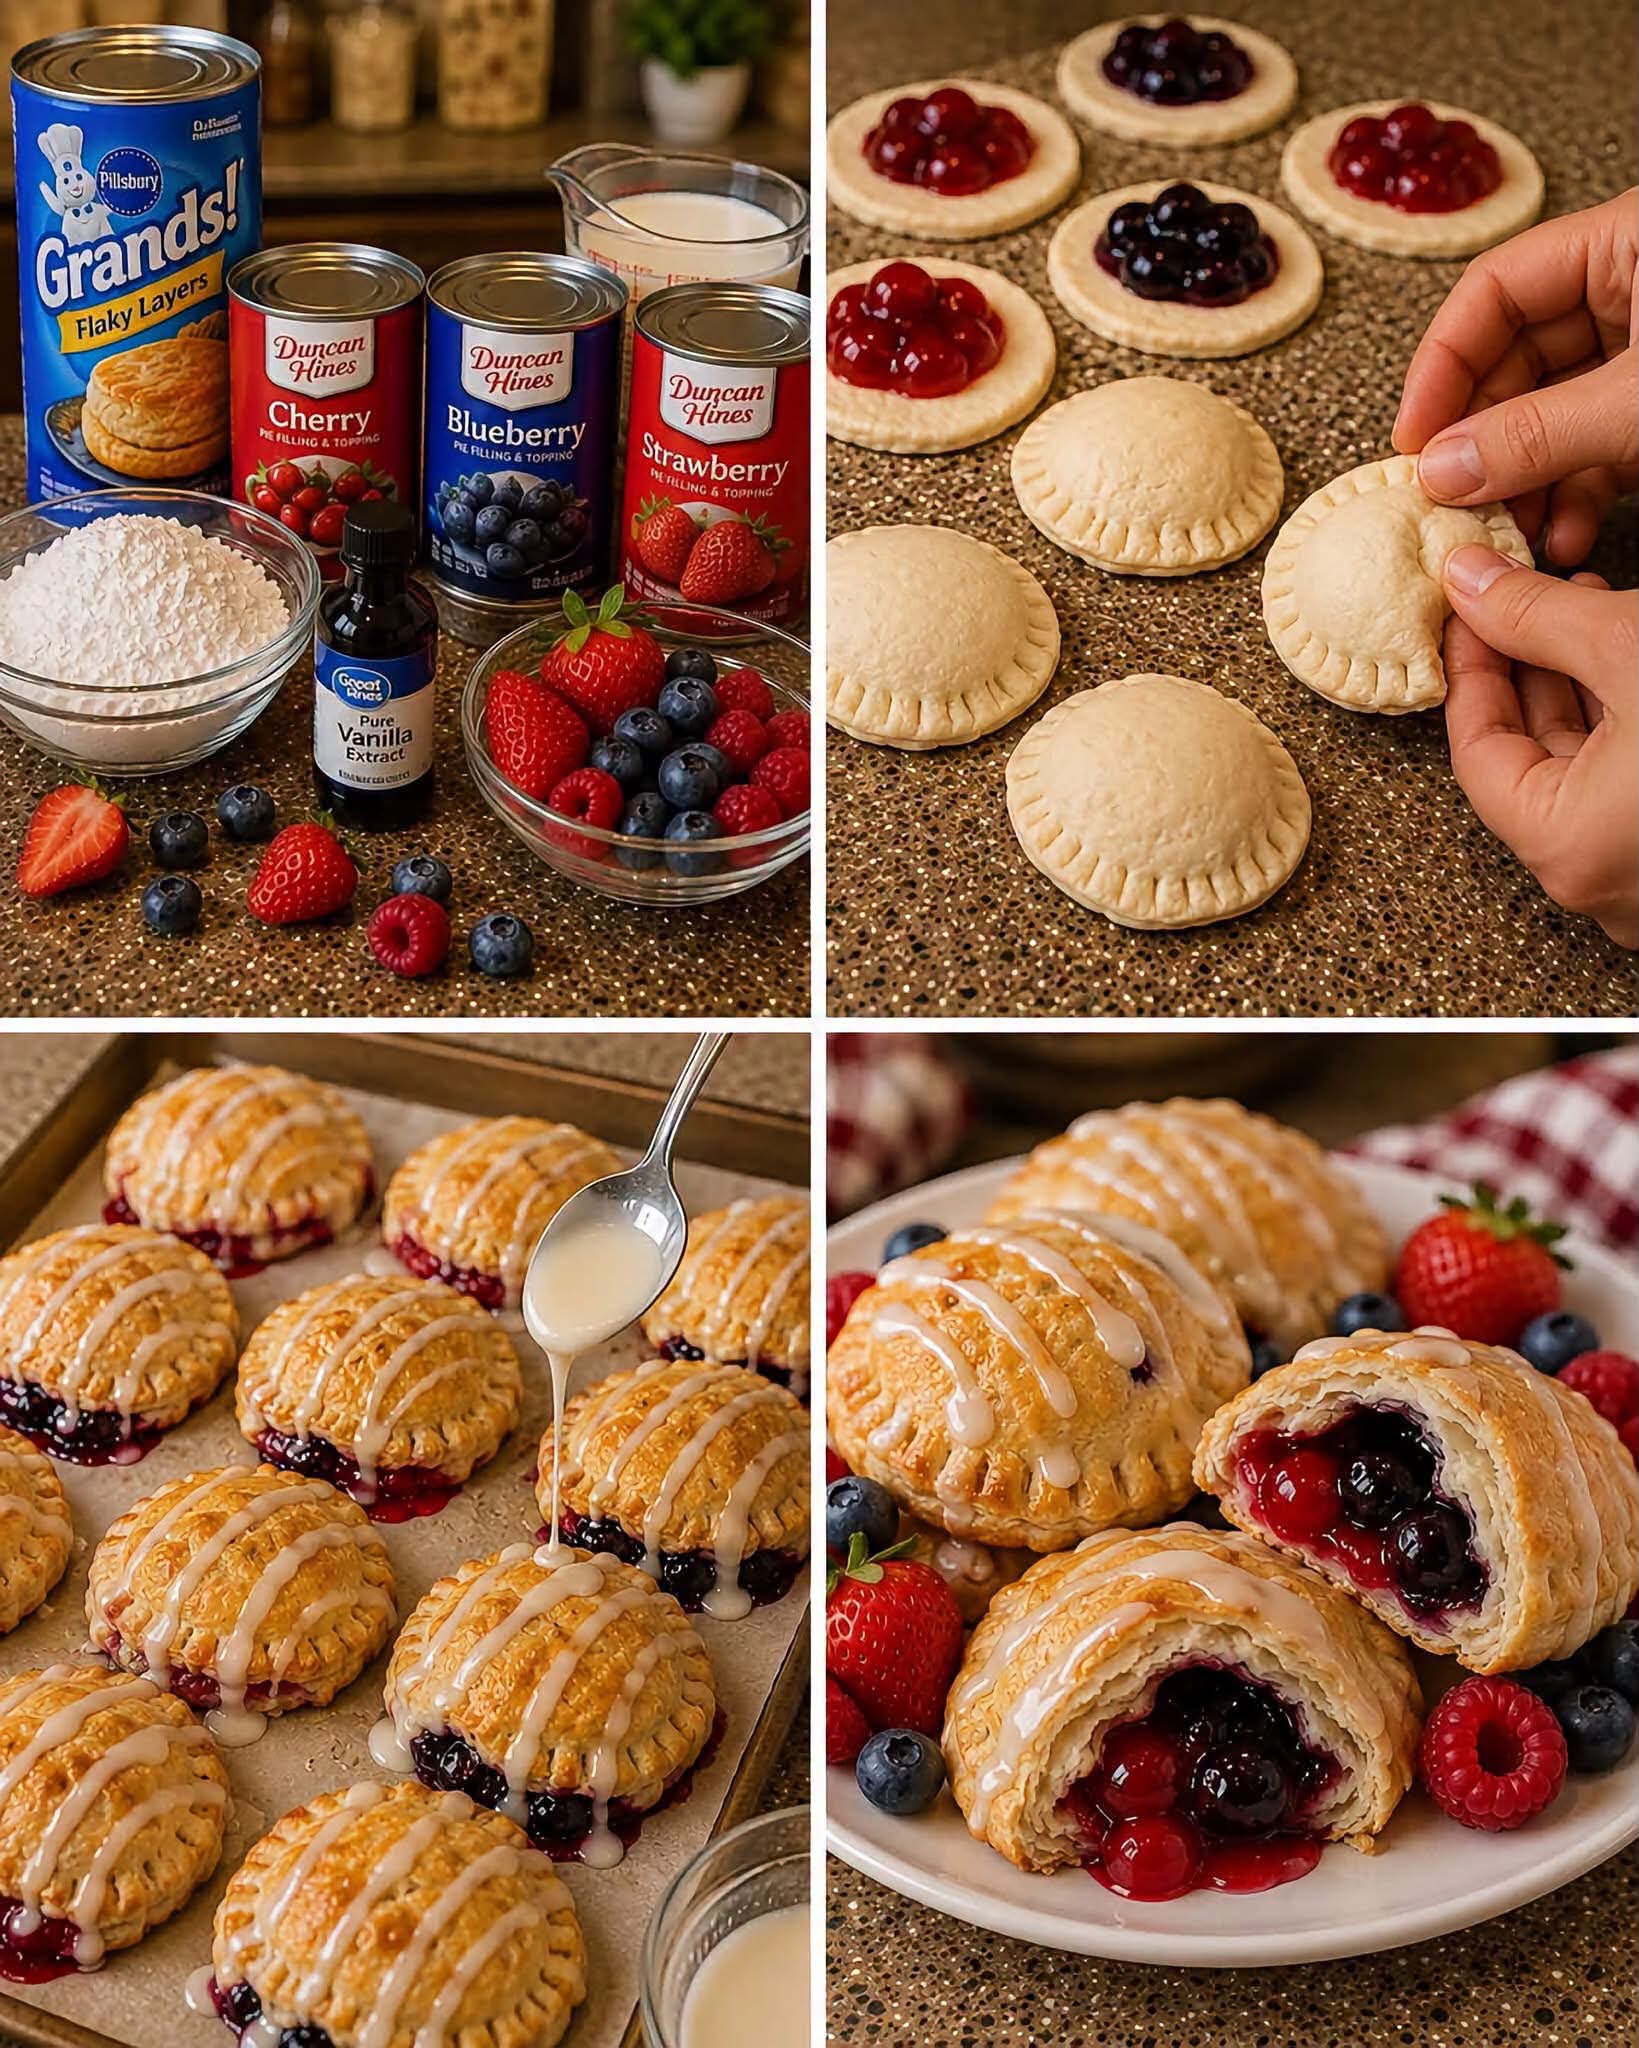
🥧🍓 Mixed Berry Glazed Hand Pies
Flaky Mini Pastries Filled with Cherry, Blueberry & Strawberry
These Mixed Berry Glazed Hand Pies are little pockets of pure dessert happiness! Imagine golden, flaky pastry wrapped around three delicious fruit fillings—sweet cherry, juicy blueberry, and bright strawberry—then finished with a beautiful vanilla glaze that drips over the tops.
They are perfect for parties, holidays, bake sales, picnics, family gatherings, afternoon treats, or simply when you want an easy homemade dessert without making pie dough from scratch. The use of refrigerated flaky biscuits makes this recipe wonderfully simple while still creating a warm, golden, bakery-style treat.
Each hand pie is small enough to hold in your hand, making them fun to serve and easy to enjoy. You can make them all one flavor, or create a beautiful assortment so everyone can choose their favorite berry filling!
🍓✨ Recipe Overview
Preparation Time: 20 minutes
Baking Time: 12–18 minutes
Total Time: About 40 minutes
Servings: 8–10 hand pies, depending on biscuit size
Difficulty: Easy
Best For: Parties, holidays, family desserts, brunch, picnics, and sweet snacks
📝 Ingredients
🥧 For the Hand Pies
- 1 can Pillsbury Grands Flaky Layers Biscuits
- 1 can cherry pie filling
- 1 can blueberry pie filling
- 1 can strawberry pie filling
You may use all three fillings to create a mixed berry variety, or choose just one favorite flavor.
🍯 For the Vanilla Glaze
- 1 cup powdered sugar
- 2–3 tablespoons milk
- 1 teaspoon pure vanilla extract
✨ Optional Egg Wash
- 1 egg, beaten
The egg wash gives the hand pies a beautiful shiny, golden-brown finish.
🍓 For Serving
- Fresh strawberries
- Fresh blueberries
- Fresh raspberries
- Powdered sugar
- Whipped cream
- Vanilla ice cream
- Extra berry sauce, if desired
🧰 Equipment
- Baking sheet
- Parchment paper or nonstick baking spray
- Rolling pin or clean glass
- Fork
- Small bowl
- Pastry brush
- Spoon
- Wire cooling rack
👩🍳 Instructions: How to Make Mixed Berry Hand Pies
Step 1: Prepare the Oven
Preheat your oven to 375°F (190°C).
Line a baking sheet with parchment paper or lightly grease it with nonstick cooking spray.
The parchment paper is especially helpful because some fruit filling may escape during baking and become sticky.
Step 2: Prepare the Biscuit Dough
Open the can of flaky biscuits carefully.
Separate the biscuits and place them on a lightly floured surface.
Using a rolling pin or the palm of your hand, gently flatten each biscuit into a round circle. Try to make each one approximately 4–5 inches wide.
Do not roll the dough too thin. You want the pastry to remain soft and flaky.
Important Tip
The biscuits will puff during baking, so flatten them enough to create space for the filling while still leaving enough dough around the edges to seal the pies.
🍒🫐🍓 Step 3: Add the Fruit Filling
Place a spoonful of fruit filling in the center of each flattened biscuit.
For a mixed assortment:
- Fill some with cherry pie filling
- Fill some with blueberry pie filling
- Fill some with strawberry pie filling
Use approximately 1 tablespoon of filling per hand pie.
Do not overfill the dough. Too much filling can cause the hand pies to burst open while baking.
🥧 Step 4: Fold and Seal the Hand Pies
Fold the biscuit dough over the filling to create a half-moon shape.
Press the edges together gently with your fingers.
Then use the tines of a fork to crimp around the entire edge.
This helps seal the pies and creates a beautiful decorative border.
If the dough feels dry or does not seal easily, lightly moisten the edge with a tiny amount of water.
✨ Step 5: Add the Egg Wash
Place the sealed hand pies onto the prepared baking sheet.
If using the optional egg wash, brush the tops lightly with the beaten egg.
The egg wash helps create a lovely golden, glossy finish.
For extra decoration, you can make two or three tiny cuts in the top of each pie. These small openings allow steam to escape.
🔥 Step 6: Bake Until Golden
Place the baking sheet in the preheated oven.
Bake for approximately 12–18 minutes, or until the hand pies are puffed and beautifully golden brown.
The exact baking time may vary depending on the size and thickness of the biscuit dough.
Keep an eye on them during the final few minutes.
They are ready when:
- The tops are golden brown.
- The edges are lightly crisp.
- The pastry has puffed.
- The filling is warm and bubbling.
❄️ Step 7: Cool the Hand Pies
Remove the hand pies from the oven and allow them to cool on the baking sheet for about 10 minutes.
Then transfer them to a wire rack.
The fruit filling will be extremely hot immediately after baking, so cooling is important.
🍦 Step 8: Make the Vanilla Glaze
In a small bowl, combine:
- 1 cup powdered sugar
- 2 tablespoons milk
- 1 teaspoon vanilla extract
Whisk until smooth.
If the glaze is too thick, add a few drops of milk at a time.
If the glaze is too thin, add a little more powdered sugar.
You want a glaze that is thick enough to drizzle but still flows beautifully over the hand pies.
🍯 Step 9: Drizzle and Decorate
Once the hand pies have cooled slightly, drizzle the vanilla glaze over the tops.
You can use:
- A spoon
- A piping bag
- A small plastic sandwich bag with the corner snipped off
For a beautiful presentation, arrange the different flavors together on a large serving platter.
Garnish with fresh strawberries, blueberries, and raspberries.
🌟 The Best Method for Perfect Hand Pies
The secret to successful hand pies is not overfilling them.
Fruit pie filling contains syrup and moisture. During baking, the filling becomes hot and can expand.
A modest amount of filling allows the pastry to seal properly and keeps the hand pies neat.
The perfect method is:
- Flatten the dough evenly.
- Place the filling in the center.
- Leave a clean border around the edges.
- Fold carefully.
- Press and crimp firmly.
- Add a small vent.
- Bake until golden.
- Cool before glazing.
This method gives you a flaky pastry with a sweet, fruity center.
🍒🫐🍓 Flavor Formation
These hand pies are wonderful because every fruit brings something different.
🍒 Cherry
Cherry filling gives the pies a deep, rich, sweet-tart flavor. The beautiful red color makes them especially festive.
🫐 Blueberry
Blueberry filling provides a juicy, jammy sweetness and a beautiful purple-blue color.
🍓 Strawberry
Strawberry filling brings a bright, fruity sweetness that tastes especially delicious with vanilla glaze.
🍯 Vanilla Glaze
The glaze ties all the flavors together. Its creamy sweetness balances the slight tartness of the fruit and makes the pastry taste like a little bakery treat.
💡 Helpful Tips and Tricks
Do Not Overfill
One tablespoon is usually enough. Too much filling can cause leaking.
Seal the Edges Well
Press the edges with your fingers first, then crimp with a fork.
Chill the Pies Before Baking
For an even flakier crust, place the assembled hand pies in the refrigerator for about 10–15 minutes before baking.
Use Different Shapes
You can make:
- Half-moon pies
- Round pies
- Small rectangular pies
- Heart-shaped pies for Valentine’s Day
- Star-shaped pies for holidays
Make Them Extra Pretty
Add a little sugar on top before baking, or drizzle with glaze after cooling.
🍓 Serving Ideas
These Mixed Berry Hand Pies are delicious on their own, but they can also become an impressive dessert.
Serve them with:
🍦 Vanilla Ice Cream
The warm fruit filling and cold ice cream create a wonderful contrast.
🥛 Whipped Cream
Add a small spoonful of whipped cream on the side.
🍓 Fresh Berries
Scatter fresh berries around the serving platter for a beautiful presentation.
☕ Coffee or Tea
The sweet vanilla glaze pairs beautifully with coffee, tea, or hot chocolate.
🎉 Perfect Occasions for These Hand Pies
These little pies are perfect for:
- Birthday parties
- Baby showers
- Bridal showers
- Christmas gatherings
- Thanksgiving dessert tables
- Valentine’s Day
- Easter brunch
- Picnics
- Potlucks
- Bake sales
- Family movie nights
- School parties
- Afternoon tea
Because they are individually portioned, they are especially easy to serve at gatherings.
📖 A Little History of Hand Pies
Hand pies have a long and delicious history. Before modern kitchens had convenient refrigerated dough and prepared pie fillings, people made portable pies as a practical way to carry food.
Different cultures developed their own versions of hand pies. Some were savory and filled with meat or vegetables, while others were sweet and filled with fruits, jams, or custards.
Fruit-filled pastries became especially popular because fruit could be preserved with sugar and transformed into a filling that could be wrapped in dough.
The idea behind the hand pie has remained popular for generations because it is simple, practical, and comforting. Instead of serving one large pie that must be sliced, each person receives their own little pastry.
This modern version combines that classic idea with the convenience of flaky refrigerated biscuit dough and ready-to-use fruit fillings.
🧊 Storage Instructions
Store completely cooled hand pies in an airtight container.
Room Temperature
They can generally be enjoyed for a short period at room temperature when properly covered.
Refrigerator
For longer storage, refrigerate them in an airtight container.
Reheating
Warm them gently in the oven or toaster oven until heated through.
Avoid overheating because the fruit filling can become extremely hot.
❄️ Can You Freeze Them?
Yes!
For best results, freeze the assembled hand pies before baking.
Place them on a parchment-lined baking sheet and freeze until firm. Then transfer them to a freezer-safe container or bag.
When ready to bake, place them on a baking sheet and bake from frozen, adding a few extra minutes to the baking time.
Glaze them after baking and cooling.
🍓 Fun Variations
Mixed Berry Hand Pies
Combine a small amount of cherry, blueberry, and strawberry filling in one pie. Be careful not to overfill.
Lemon Berry Glaze
Add a little fresh lemon juice or lemon zest to the glaze for a bright citrus flavor.
Cinnamon Sugar Berry Pies
Sprinkle the tops with cinnamon sugar before baking.
Cream Cheese Berry Hand Pies
Add a small amount of sweetened cream cheese beneath the fruit filling.
Chocolate Berry Hand Pies
Drizzle the finished pies with melted chocolate instead of vanilla glaze.
Almond Berry Hand Pies
Add a tiny amount of almond extract to the glaze for a delicious bakery-style flavor.
❤️ Why Everyone Loves These Hand Pies
There is something special about individual desserts.
You do not need a plate and fork. You do not need to cut slices. You can simply pick one up and enjoy a flaky, fruity, sweet treat.
The pastry is golden and buttery, the filling is warm and juicy, and the vanilla glaze adds the perfect finishing touch.
And because you can make different flavors in the same batch, everyone gets to choose their favorite.
One person can enjoy cherry. Another can choose blueberry. Someone else can reach for strawberry.
That makes these hand pies wonderful for families and parties.
🎀 Final Conclusion
These Mixed Berry Glazed Hand Pies are a simple and beautiful dessert that delivers all the comfort of a traditional fruit pie in a fun, portable size.
With flaky biscuit pastry, sweet cherry, blueberry, and strawberry fillings, and a smooth vanilla glaze, every bite is full of fruity flavor and homemade comfort.
They are easy enough for a beginner baker, impressive enough for a holiday table, and delicious enough that everyone will probably ask for another one!
Serve them warm, drizzle them generously with vanilla glaze, surround them with fresh berries, and watch these little pies disappear from the dessert table.
🥧🍓 Flaky, fruity, golden, sweet, and absolutely irresistible—these are the kind of hand pies that make everyone come back for “just one more!”