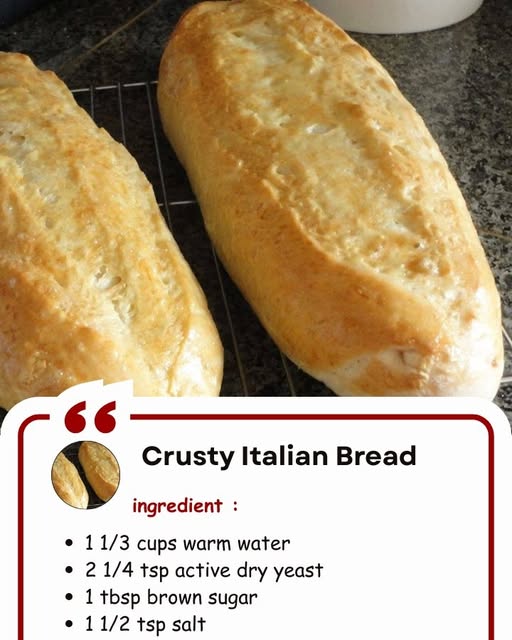
Crusty Italian Bread — Don’t LOSE This Recipe
Prep Time: 15 mins | Cook Time: 30 mins | Total Time: 1 hr 30 mins
Servings: 2 loaves | Calories: ~150 per slice
Authentic Crusty Italian Bread with Bakery-Style Results
Nothing compares to the aroma, texture, and flavor of homemade crusty Italian bread. With its golden crackling crust, soft airy interior, and classic old-world taste, this bread is a staple recipe every home baker should master. This version is designed to deliver consistent, professional-quality loaves using simple pantry ingredients and straightforward techniques.
This recipe creates two beautiful loaves with a chewy crumb and bold crust, perfect for sandwiches, dipping in olive oil, serving with pasta, or enjoying warm straight from the oven.
Ingredients for Crusty Italian Bread
Each ingredient plays a precise role in creating structure, flavor, and crust development.
- 1⅓ cups warm water (110°F)
- 2¼ teaspoons active dry yeast
- 1 tablespoon brown sugar
- 1½ teaspoons salt
- 3½ to 4 cups all-purpose flour
- 1 tablespoon olive oil (optional, for softer crumb)
Why This Italian Bread Recipe Works
This recipe is optimized for maximum crust formation while maintaining a light interior. The combination of high hydration, proper fermentation, and steam during baking produces the signature crackly crust associated with traditional Italian bakeries.
Key benefits:
- Crisp, golden crust
- Soft, airy crumb
- Minimal ingredients
- No special equipment required
- Reliable rise and structure
Activating the Yeast for Perfect Rise
In a large mixing bowl, combine the warm water, brown sugar, and active dry yeast. Stir gently and allow the mixture to rest for 5–10 minutes, until foamy. This step confirms yeast activity and ensures proper fermentation.
A strong yeast bloom is essential for achieving tall, well-structured loaves.
Mixing the Dough
Add the salt and 2 cups of flour to the yeast mixture. Stir until combined, then gradually add the remaining flour until a rough dough forms.
Turn the dough onto a lightly floured surface and knead for 8–10 minutes, until smooth, elastic, and slightly tacky. Proper kneading develops gluten, which gives the bread its chew and structure.
First Rise: Building Flavor and Structure
Place the dough in a lightly oiled bowl, turning once to coat. Cover loosely and allow it to rise in a warm place for 1 hour, or until doubled in size.
This slow fermentation enhances flavor and improves crumb texture.
Shaping the Loaves
Punch down the dough gently to release excess air. Divide into two equal portions. Shape each portion into a round or oval loaf, depending on preference.
Place loaves on a parchment-lined baking sheet or lightly floured surface. Cover and allow to rest for 15 minutes.
Creating the Signature Crust
Before baking:
- Score the tops of the loaves with a sharp knife
- Lightly dust with flour for a rustic appearance
Place a shallow pan of hot water on the lower oven rack to create steam, which is essential for a crisp crust.
Baking Instructions
Preheat oven to 425°F (220°C).
Bake loaves for 25–30 minutes, or until golden brown and hollow-sounding when tapped on the bottom. Steam during the first 10 minutes ensures maximum oven spring and crust development.
Cooling for Best Texture
Transfer baked loaves to a wire rack and cool completely before slicing. Cooling allows the crumb to set and prevents gumminess.
Texture and Flavor Profile
This crusty Italian bread delivers:
- Crackling golden crust
- Soft, airy interior
- Light chew
- Mild, balanced flavor
- Excellent slicing and tearing
The bread tastes incredible fresh and continues to perform well for sandwiches and toast.
Serving Suggestions
Serve this bread:
- With olive oil and balsamic vinegar
- Alongside pasta and soups
- For panini and sandwiches
- As garlic bread
- With cheese and cured meats
It is versatile, dependable, and universally loved.
Storage and Freezing Tips
- Store at room temperature, loosely wrapped, for 2 days
- Freeze whole or sliced for up to 2 months
- Re-crisp in oven at 375°F for 5–7 minutes
Avoid refrigeration, which dries out the crumb.
Expert Tips for Bakery-Quality Bread
- Measure flour accurately
- Do not rush the rise
- Use steam during baking
- Allow full cooling before slicing
- Knead until elastic, not sticky
These details separate average bread from exceptional bread.
Common Variations
This base recipe adapts beautifully:
- Add Italian herbs for flavor
- Mix in garlic or rosemary
- Use bread flour for extra chew
- Shape into rolls or baguettes
Each variation maintains structure while enhancing flavor.
Why Homemade Italian Bread Is Worth It
Homemade crusty Italian bread offers unmatched freshness, control over ingredients, and superior flavor compared to store-bought loaves. Once mastered, it becomes a staple recipe used weekly.
A Recipe Worth Keeping Forever
Crusty Italian Bread is more than a recipe—it is a foundational skill. With its crisp crust, tender crumb, and authentic flavor, this bread earns a permanent place in every kitchen.
Once baked, it becomes a go-to favorite for countless meals.