The Ultimate City Chicken Recipe: A Crispy, Golden Classic Perfect for Any Dinner Table
Crafting the perfect City Chicken Recipe means honoring a Midwestern classic that has stood the test of time. With irresistible crispy coating, tender pork or veal, and rich optional pan gravy, this dish remains a beloved comfort food that brings families together. Below, we present a deeply detailed, expertly written, and thoroughly optimized step-by-step guide to creating the best homemade City Chicken—one that delights your guests and elevates your cooking game.
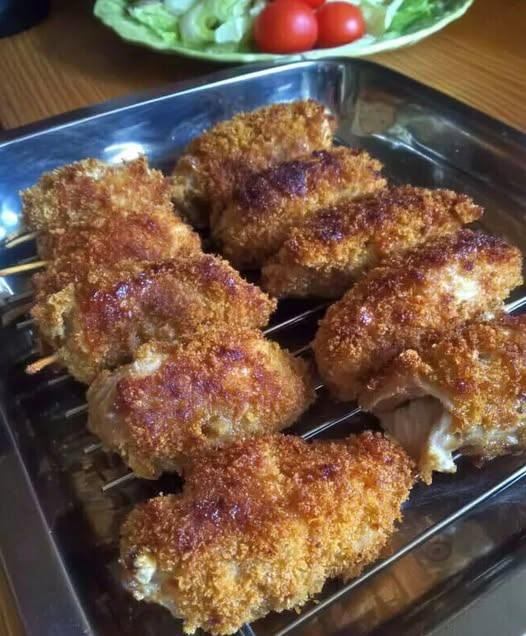
What Is City Chicken? A Timeless Midwest Favorite
Despite its name, City Chicken contains no chicken at all. This traditional dish was born in times when poultry was more expensive than pork or veal. Home cooks used cubed meat skewered to resemble a drumstick, fried to golden perfection, and sometimes finished in the oven. Today, it remains a nostalgic staple, known for its satisfying crunch and melt-in-your-mouth texture.
Ingredients for the Perfect City Chicken Skewers
Crafting authentic City Chicken begins with a few simple but high-quality ingredients. These items ensure a flavorful, juicy result every time.
For the Skewers
- 1 ½ lbs boneless pork loin and/or veal, cut into consistent 1-inch cubes
- Salt and freshly ground black pepper, to season
- 2 large eggs, beaten
- 1 cup seasoned breadcrumbs
- 2 tbsp grated Parmesan cheese
- ½ tsp paprika
- ½ cup vegetable or canola oil, for frying
- Wooden skewers, soaked in water for 30 minutes
Optional Pan Gravy
- 2 tbsp all-purpose flour
- ½ cup chicken broth or stock
- Salt and pepper, to taste
How to Make Authentic City Chicken: Step-by-Step Preparation
1. Prepare and Season the Meat
To achieve the signature tenderness of City Chicken, begin by cutting your pork loin and/or veal into even, 1-inch cubes. This consistency ensures even cooking and creates the appearance of a drumstick once skewered.
Generously season all sides of the meat with salt and freshly ground black pepper to create a flavorful base.
2. Assemble the Classic City Chicken Skewers
Take your soaked wooden skewers and thread 3 to 4 cubes of meat onto each one. Packing them closely helps maintain shape and moisture during cooking.
Coating the Skewers for Maximum Crispiness
3. Prepare the Breading Station
Set up two shallow bowls:
- One with beaten eggs
- One with seasoned breadcrumbs, Parmesan cheese, and paprika
The Parmesan adds savory richness, while paprika enhances color and subtle warmth.
4. Bread the Skewers
Dip each meat skewer into the egg mixture, ensuring full coverage. Then roll gently in the breadcrumb mixture, pressing lightly so the coating adheres. This creates the foundation of the iconic crispy crust.
Cooking Methods for Perfectly Crispy City Chicken
5. Pan-Frying to Golden Perfection
Heat ½ cup vegetable or canola oil in a large skillet over medium heat. Once shimmeringly hot, carefully place the breaded skewers in the pan.
Cook each side for 3–4 minutes, turning until the coating becomes deep golden brown and irresistibly crisp.
The meat does not need to cook fully at this stage—the goal is to create an exterior crust.
6. Oven Finish for Tender, Juicy Meat
Preheat your oven to 350°F (175°C).
Transfer the fried skewers to a baking dish and cover tightly with foil. Bake for 20–25 minutes, allowing the pork or veal to finish cooking gently without drying out.
This final step guarantees perfect tenderness throughout.
Creating a Luxurious Pan Gravy (Optional but Highly Recommended)
While your skewers are finishing in the oven, take advantage of the flavorful browned bits left in your skillet.
7. Make the Roux
Sprinkle 2 tbsp all-purpose flour into the pan drippings and whisk until smooth, forming a golden roux.
8. Add the Broth
Slowly pour in ½ cup chicken broth, whisking constantly until a rich, silky gravy forms. Season with salt and pepper to taste.
This gravy pairs beautifully with the crispy fried coating, adding depth and moisture to every bite.
Serving Suggestions for an Authentic City Chicken Experience
City Chicken shines when paired with classic comfort sides. Some exceptional options include:
- Creamy mashed potatoes to soak up the gravy
- Buttered egg noodles for a nostalgic feel
- Steamed green beans or carrots for a balanced meal
- Cabbage rolls or sauerkraut for a traditional Polish-American touch
For the perfect finish, drizzle the skewers with your pan gravy and serve hot.
Why This City Chicken Recipe Works Every Time
This recipe succeeds because it combines:
- Premium, evenly cut meat
- A well-seasoned breadcrumb coating
- Two-step cooking for crispiness and juiciness
- Optional gravy that elevates the entire dish
The balance of texture and flavor creates a meal your family will request again and again.
Expert Tips for the Best Results
Use Uniform Meat Cubes
Consistent cuts help the skewers cook evenly and maintain shape.
Avoid Overcrowding the Pan
Give each skewer space to crisp properly.
Don’t Skip the Oven Step
Pan-frying alone can leave meat undercooked; baking ensures tenderness without overbrowning.
Let the Meat Rest
Allow the skewers to sit for 5 minutes after baking to retain juices.
Storing and Reheating City Chicken
Refrigeration
Store leftovers in an airtight container for up to 3 days.
Freezing
Wrap tightly and freeze for up to 2 months. Reheat in a 350°F oven for best texture.
Conclusion: A City Chicken Recipe That Elevates Tradition
This City Chicken Recipe blends time-honored preparation with modern precision, producing a dish that is crisp, flavorful, and unforgettable. By following each detailed step, you’ll create a meal that captures the authentic Midwest essence while delivering restaurant-quality results.
Whether you prepare it for a weeknight dinner or a festive family gathering, this dish is sure to impress and satisfy.