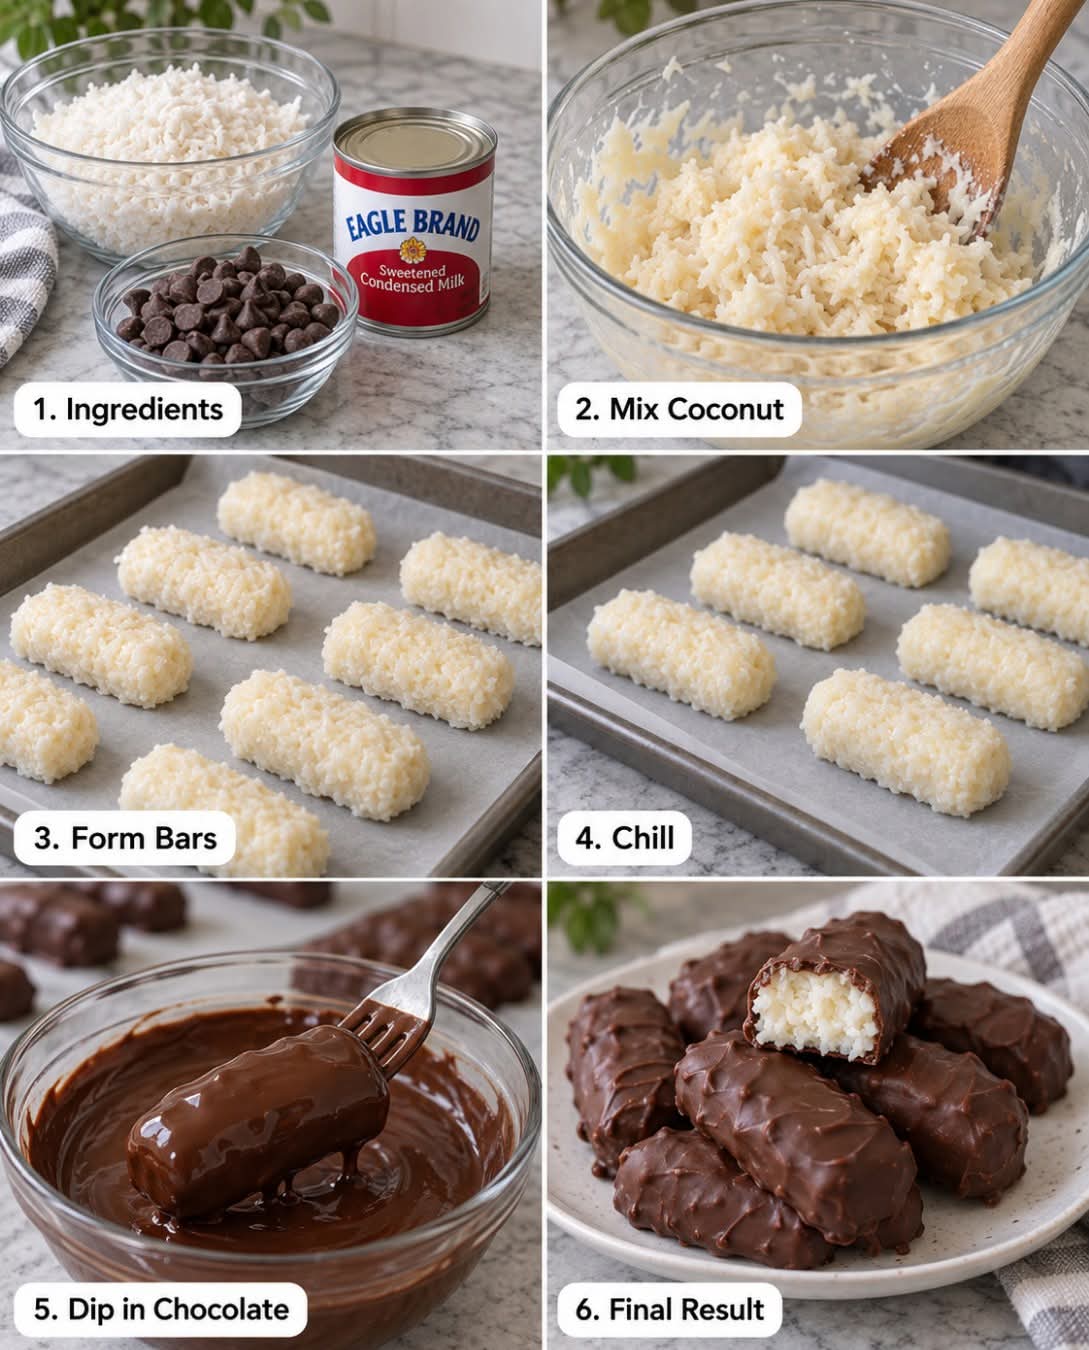
🍫🥥 3-Ingredient Mounds Bars 🥥🍫
Introduction
If you love the classic combination of sweet coconut and rich chocolate, these easy 3-Ingredient Mounds Bars are a treat you’ll want to make again and again! With just three simple ingredients, you can create delicious homemade coconut bars without a long ingredient list or complicated baking steps.
These bars are soft, chewy, creamy, and covered in a beautiful layer of chocolate. They’re perfect for holidays, parties, cookie trays, bake sales, or simply when you’re craving something sweet.
The best part? No complicated candy-making techniques are required. Mix the coconut filling, shape it into bars, chill until firm, and coat everything in chocolate. That’s it!
🛒 Ingredients
For the Coconut Filling
- 3 cups sweetened shredded coconut
- 1 can (14 oz) sweetened condensed milk
- 2 cups semi-sweet or milk chocolate chips
Optional
- 1 teaspoon coconut oil or shortening, if needed to thin the melted chocolate
Note: Traditional Mounds-style candy is generally associated with dark chocolate and coconut. If you prefer a sweeter candy-bar flavor, milk chocolate works beautifully too.
👩🍳 Instructions
Step 1: Prepare the Coconut Mixture
Line an 8×8-inch baking pan or small rectangular dish with parchment paper, leaving some paper hanging over the sides so the finished coconut mixture is easy to lift out.
Place the shredded coconut in a large mixing bowl.
Pour the sweetened condensed milk over the coconut. Stir thoroughly until every bit of coconut is coated and the mixture becomes thick and sticky.
The mixture should hold together when pressed. If it seems extremely loose, let it sit for a few minutes so the coconut can absorb some of the condensed milk.
Step 2: Form the Coconut Layer
Transfer the coconut mixture into the parchment-lined pan.
Using the back of a spoon, spatula, or lightly dampened fingers, press the mixture down firmly and evenly.
Try to make the surface as level as possible so your finished bars have a neat, even shape.
Place the pan in the refrigerator for about 1–2 hours, or until the coconut layer becomes firm.
For an even firmer texture, you can chill it longer.
Step 3: Cut Into Bars
Once the coconut mixture is firm, carefully lift it from the pan using the parchment paper.
Place it on a cutting board.
Using a sharp knife, cut the coconut into small rectangular bars.
You can make them thick and chunky or smaller bite-sized pieces depending on how you plan to serve them.
🍫 Step 4: Melt the Chocolate
Place the chocolate chips in a microwave-safe bowl.
Heat in 20–30 second intervals, stirring well between each interval.
Continue until the chocolate is mostly melted, then stir until completely smooth.
Be careful not to overheat the chocolate.
If your chocolate seems too thick for dipping, stir in a small amount of coconut oil or shortening until you reach a smooth dipping consistency.
🥥 Step 5: Coat the Coconut Bars
Using a fork or dipping tool, carefully place one chilled coconut bar into the melted chocolate.
Turn it gently until completely coated.
Lift the bar out and allow the excess chocolate to drip back into the bowl.
Place the chocolate-covered bar onto a parchment-lined tray.
Repeat with the remaining coconut bars.
❄️ Step 6: Let the Chocolate Set
Place the tray in the refrigerator for approximately 15–30 minutes, or until the chocolate has completely hardened.
Once set, your homemade Mounds-style bars are ready to enjoy!
⭐ Method
The method behind these simple bars is all about creating layers of texture.
First, the sweetened condensed milk binds the coconut together, creating a soft and chewy center.
Next, chilling the coconut mixture allows it to firm up enough to cut and handle.
Finally, the coconut centers are coated in melted chocolate, creating the delicious contrast between the creamy, chewy coconut and the crisp chocolate shell.
The process is simple, but the result tastes like something much more complicated.
📖 A Little History
Chocolate-and-coconut candies have been popular in American confectionery for generations. The combination became especially recognizable through commercial coconut candy bars, including the famous Mounds bar.
The classic Mounds-style combination is known for pairing a sweet coconut center with dark chocolate. Its appeal comes from a simple contrast: rich chocolate on the outside and sweet, chewy coconut inside.
Homemade versions became popular because they allow families to recreate that familiar flavor with a handful of pantry ingredients.
This 3-ingredient version takes that idea and makes it especially easy.
🍬 Formation of the Bars
The formation process is what gives these treats their classic candy-bar appearance.
1. Coconut Center
The shredded coconut and condensed milk are combined into a thick mixture.
2. Firming
Chilling gives the coconut mixture enough structure to be shaped and dipped.
3. Cutting
The firm coconut is sliced into individual portions.
4. Chocolate Coating
Each piece receives a generous coating of melted chocolate.
5. Final Setting
The finished bars are chilled again so the chocolate becomes firm and glossy.
The result is a homemade candy with a soft center and satisfying chocolate coating.
❤️ Tips for Perfect Mounds Bars
- Chill the coconut mixture well before cutting.
- Use parchment paper so the coconut layer lifts easily from the pan.
- Don’t overheat the chocolate.
- Make sure the coconut centers are cold before dipping.
- If the chocolate is too thick, add a tiny amount of coconut oil.
- Keep the finished bars refrigerated for the firmest texture.
- For smaller treats, cut the coconut layer into bite-sized pieces.
- Use dark chocolate for a more traditional Mounds-style flavor.
- Use milk chocolate if you prefer a sweeter candy.
🍫 Serving Ideas
These homemade coconut bars are wonderful served:
- With coffee or tea
- On a holiday dessert tray
- At birthday parties
- As homemade gifts
- At bake sales
- Alongside cookies and brownies
- As an after-dinner sweet
- Packed into small treat bags for family and friends
They also make a lovely addition to Christmas candy trays!
💕 For the Coconut Lovers
If you’re a serious coconut lover, these bars are especially hard to resist.
The coconut center is sweet, soft, and chewy, while the chocolate coating adds richness and a little snap when you bite into it.
For an extra coconut-forward treat, you can use unsweetened coconut inside if you prefer to control the sweetness, although the classic version uses sweetened shredded coconut.
You can also experiment with the chocolate coating to create your favorite combination.
💡 Easy Variations
Dark Chocolate Coconut Bars
Use dark chocolate chips for a richer, more bittersweet flavor.
Milk Chocolate Coconut Bars
Use milk chocolate for a sweeter, creamier candy.
Almond Joy-Inspired Bars
Place a whole or sliced roasted almond on top of each coconut center before coating with chocolate.
Coconut Snowballs
Instead of rectangular bars, shape the coconut mixture into small balls and dip them in chocolate.
Holiday Coconut Bites
Decorate the chocolate-coated bars with festive sprinkles before the chocolate sets.
🧊 Storage
Store the finished bars in an airtight container in the refrigerator.
They are best served chilled or allowed to sit at room temperature for a few minutes before eating.
For a firmer chocolate coating, keep them refrigerated.
🥥 Conclusion
These 3-Ingredient Mounds Bars prove that homemade candy doesn’t have to be complicated. With just coconut, sweetened condensed milk, and chocolate, you can make a delicious treat that looks beautiful and tastes wonderfully indulgent.
They’re easy enough for a beginner, fun enough to make with the family, and delicious enough to disappear quickly from the dessert table!
Make a batch, chill them until perfectly firm, and enjoy that irresistible combination of chewy coconut and rich chocolate. ❤️
🍫🥥 Final Thought
Sometimes the simplest recipes become the ones we make over and over again. These little coconut-and-chocolate bars are easy, nostalgic, and perfect for sharing.
Save this recipe, make a batch, and enjoy every delicious bite! ❤️