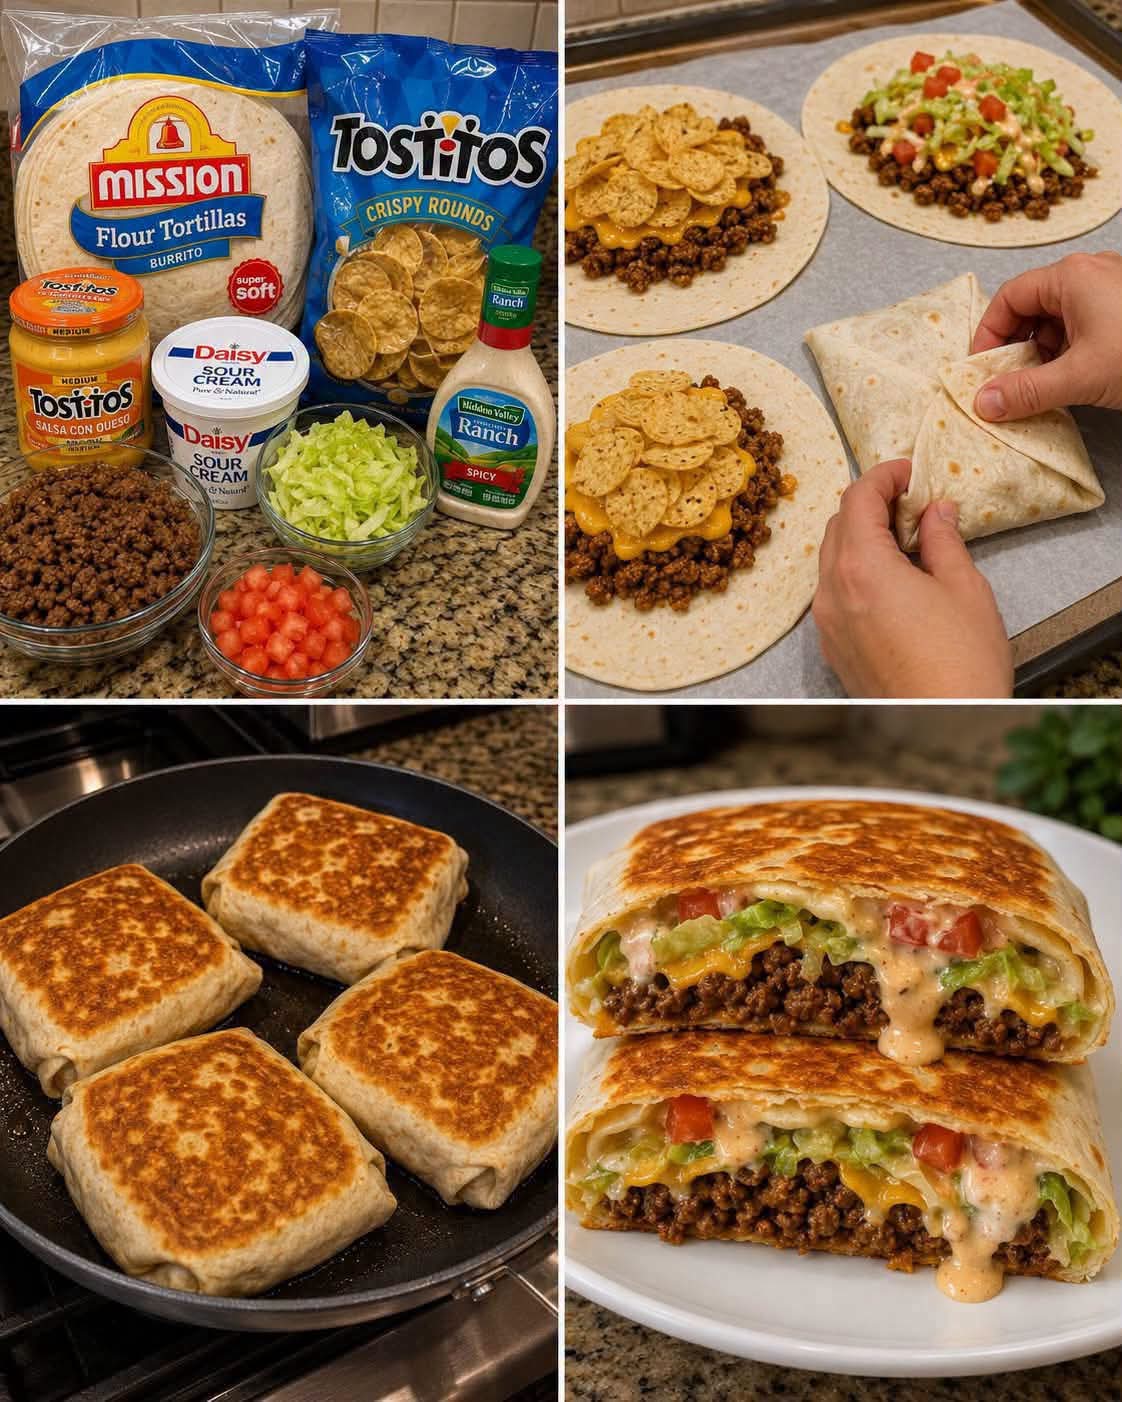
Absolutely! Here’s a big, detailed Crunchwrap recipe with the introduction, history, ingredients, preparation methods, formation, serving ideas, and conclusion you like. 🌮🧀
🌮 CRUNCHWRAPS
Crispy, Cheesy, Beefy & Loaded With Taco Flavor
🌟 Introduction
Crunchwraps are the perfect answer when you’re craving tacos but want something a little different. They combine seasoned ground beef, creamy queso, cool sour cream, crunchy tortilla chips, and a soft flour tortilla—all folded together into a neat, golden package.
The magic is in the contrast of textures: the outside becomes beautifully toasted and crisp, while the inside stays warm, cheesy, creamy, and crunchy.
This homemade version is easy enough for a weeknight dinner and fun enough for a family taco night. Serve them with salsa, guacamole, lettuce, tomatoes, or your favorite taco toppings.
📖 A Little History
The Crunchwrap is a modern Tex-Mex fast-food creation associated with Taco Bell. It became popular because it transformed familiar taco ingredients into a portable, folded meal.
The basic idea is simple: soft tortilla + seasoned filling + crunchy center + cheese or queso + clever folding + griddling.
Homemade versions have become especially popular because you can customize them with different meats, cheeses, vegetables, sauces, and crunchy toppings.
🛒 Ingredients
For the Beef Filling
- 4 large Mission flour tortillas
- 1 lb ground beef
- 1 packet taco seasoning
- ⅓–½ cup water, as needed for the seasoning
For the Crunchy Layer
- 1 bag Tostitos Crispy Rounds
For the Creamy Layer
- 1 jar Tostitos Salsa Con Queso
- ½ cup Daisy sour cream
Optional Toppings
- 1 cup shredded lettuce
- 1 large tomato, diced
- 1 cup shredded cheddar or Mexican-blend cheese
- Diced onions
- Sliced jalapeños
- Fresh cilantro
- Guacamole
- Salsa
- Hot sauce
For Cooking
- 1–2 tablespoons vegetable or canola oil, optional
👩🍳 Instructions
Step 1: Prepare the Ground Beef
Place a large skillet over medium-high heat.
Add the ground beef and break it apart with a wooden spoon or spatula.
Cook for approximately 6–8 minutes, stirring occasionally, until the beef is browned and cooked through.
Drain excess grease if necessary.
Add the taco seasoning and the amount of water recommended on the seasoning packet, usually around ⅓–½ cup.
Stir everything together.
Reduce the heat and simmer for about 3–5 minutes, allowing the seasoning to soak into the beef.
The finished beef should be flavorful but not watery.
🧀 Step 2: Prepare the Queso
Warm the Tostitos Salsa Con Queso gently in a small saucepan or microwave-safe bowl.
If using the microwave, heat it in short intervals and stir between each one.
You want the queso warm and spoonable, not boiling hot.
🥛 Step 3: Prepare the Sour Cream
Place the sour cream in a small bowl and stir it until smooth.
For an extra flavorful version, you can mix in:
- A pinch of taco seasoning
- A squeeze of lime juice
- A little hot sauce
This gives the sour cream a delicious taco-night kick.
🌯 Step 4: Build the Crunchwrap
Place one large flour tortilla on a clean work surface.
Spoon approximately ¼ of the seasoned beef into the center.
Don’t spread the beef all the way to the edges. Leave plenty of room around the outside for folding.
Add a generous spoonful of warm queso over the beef.
Place several Tostitos Crispy Rounds on top of the queso.
The chips create the famous crunchy center.
Add approximately 2 tablespoons of sour cream over the crunchy layer.
If desired, add:
- Shredded lettuce
- Diced tomatoes
- Shredded cheese
- Onions
- Jalapeños
🔄 Step 5: The Formation & Folding
This is the most important part!
Start by folding one section of the tortilla toward the center.
Continue folding around the tortilla, working your way around in a circle.
You want to create a sealed, hexagon-like package.
Keep the filling pushed toward the center while folding so nothing escapes.
💡 Folding Tip
If your tortilla is very large, you should have enough extra tortilla around the filling to fold everything securely.
If you find that the tortilla isn’t large enough, place a small tortilla piece over the filling before folding. This helps seal the center.
🔥 Step 6: Toast the Crunchwrap
Heat a large nonstick skillet over medium heat.
Lightly grease the pan if desired.
Carefully place the Crunchwrap seam-side down in the skillet.
Press it gently with a spatula.
Cook for approximately 2–4 minutes, or until the bottom becomes golden brown and crisp.
Carefully flip it.
Cook the other side for another 2–4 minutes.
Press gently while cooking to help the folds stay sealed.
The finished Crunchwrap should be:
✨ Golden brown
✨ Crispy outside
✨ Warm inside
✨ Cheesy and creamy
✨ Crunchy in the center
🌮 Step 7: Repeat
Repeat the process with the remaining tortillas and ingredients.
Try not to overcrowd the skillet. Cooking one or two at a time makes it easier to get that beautiful golden crust.
🍽️ Serving Method
Let each Crunchwrap rest for 1–2 minutes before cutting.
Then slice it in half.
You’ll see the delicious layers:
Golden tortilla → seasoned beef → queso → crispy chips → sour cream → fresh toppings.
Serve immediately while everything is warm and crunchy.
❤️ Why Lovers Love These Crunchwraps
There are so many reasons people love homemade Crunchwraps!
🥩 Flavorful Beef
The taco-seasoned beef provides a savory, spicy foundation.
🧀 Creamy Queso
Warm queso melts into the beef and gives every bite a rich, cheesy flavor.
🥔 Crunchy Center
The Crispy Rounds provide that satisfying crunch without requiring deep frying.
🥛 Cool Sour Cream
Sour cream balances the warm taco seasoning and queso.
🌯 Crispy Tortilla
Toasting the outside creates a golden shell that holds everything together.
👨👩👧👦 Family Friendly
Everyone can customize their Crunchwrap with their favorite toppings.
🌶️ Delicious Variations
🌶️ Spicy Crunchwrap
Add jalapeños, hot sauce, and a pinch of cayenne to the beef.
🧀 Extra-Cheesy Crunchwrap
Add shredded cheddar or Monterey Jack between the beef and crunchy layer.
🍗 Chicken Crunchwrap
Replace ground beef with shredded cooked chicken seasoned with taco seasoning.
🫘 Bean Crunchwrap
Add refried beans underneath the beef for an extra hearty meal.
🥑 Guacamole Crunchwrap
Add a thin layer of guacamole with the fresh toppings.
🥬 Fresh Veggie Crunchwrap
Add lettuce, tomatoes, onions, avocado, and cilantro for a fresher version.
⭐ Helpful Tips for the Perfect Crunchwrap
Don’t overfill it.
Too much filling makes folding difficult and can cause the tortilla to tear.
Keep the beef fairly dry.
Excess liquid can make the tortilla soggy.
Don’t cook on extremely high heat.
Medium heat gives the tortilla time to become crisp while warming the inside.
Start seam-side down.
This helps the folds seal while the tortilla cooks.
Don’t skip the crunchy layer.
That’s what gives the Crunchwrap its signature texture!
Serve immediately.
The longer it sits, the more the crunchy center softens.
🥗 What to Serve With Crunchwraps
These are delicious alongside:
- Mexican rice
- Refried beans
- Corn salad
- Guacamole
- Pico de gallo
- Salsa
- Tortilla chips
- Fresh avocado
- A simple green salad
For drinks, try iced tea, lemonade, sparkling water with lime, or your favorite soda.
🧡 Conclusion
Homemade Crunchwraps are one of those meals that feel like comfort food and fun food at the same time.
You’ve got seasoned beef, creamy queso, cool sour cream, crunchy chips, and a golden toasted tortilla all packed into one delicious handheld meal.
The best part is that the recipe is completely customizable. Make it spicy, extra cheesy, loaded with vegetables, or keep it simple with beef, queso, sour cream, and crispy chips.
Once you learn the folding technique, you can create your own Crunchwrap combinations again and again.
🌮❤️ Crunchy outside. Creamy inside. Taco flavor in every bite!
If you love easy homemade comfort food, save this recipe and share it with someone who would LOVE a cheesy Crunchwrap tonight!