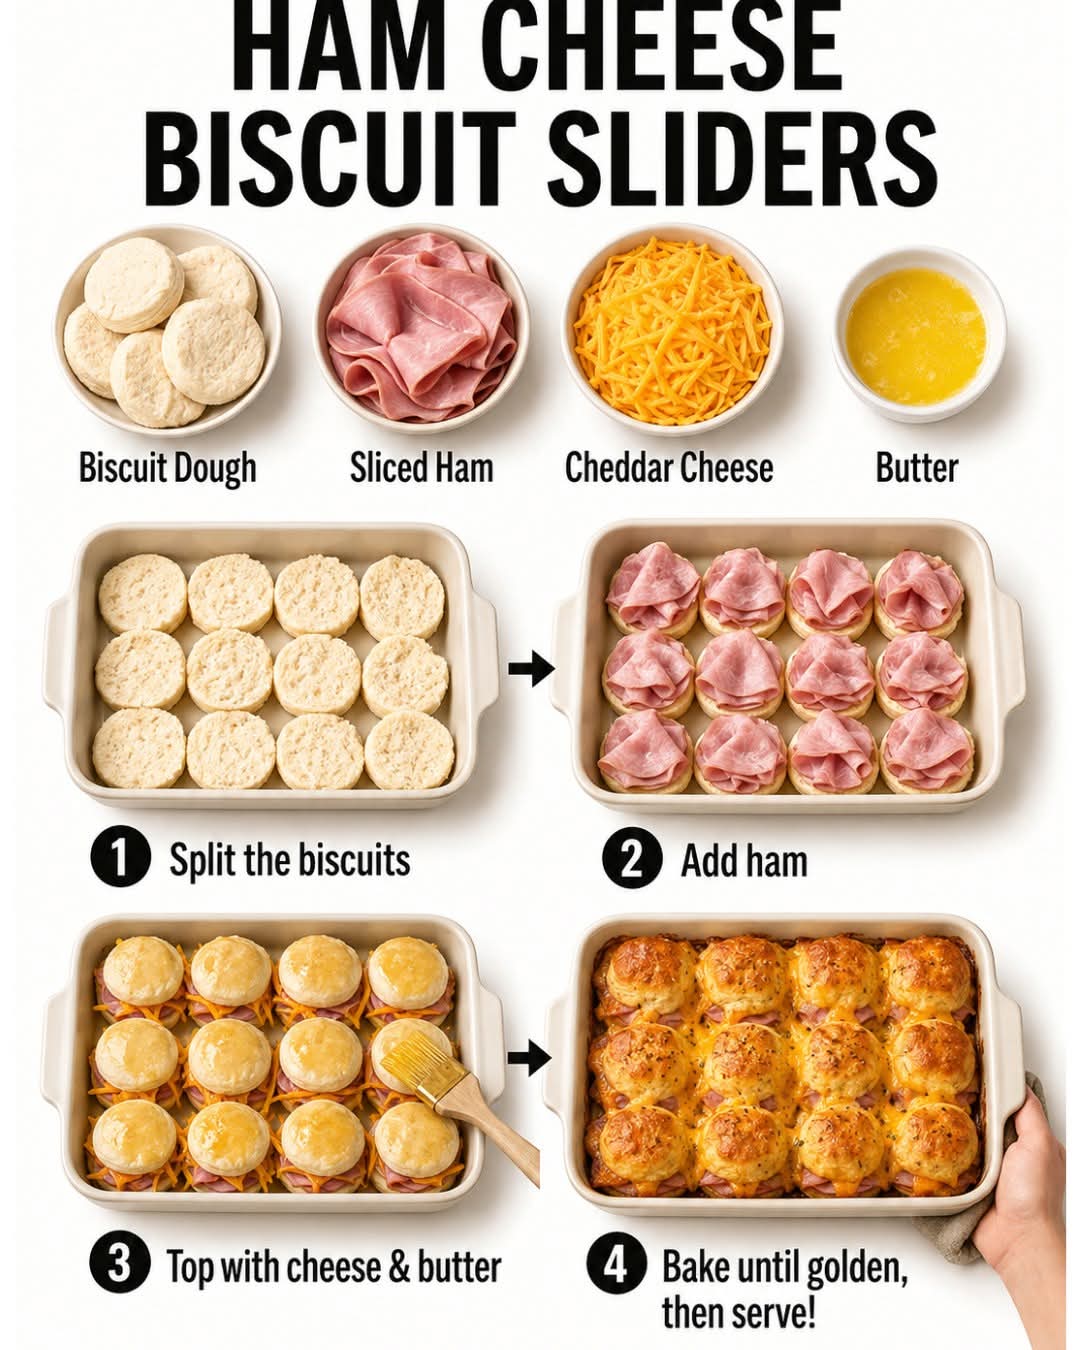
Absolutely! Here’s a big, detailed, crowd-pleasing recipe for Ham & Cheese Biscuit Sliders—warm, buttery, cheesy, and perfect for breakfast, brunch, parties, or an easy family dinner. 🥓🧀🥐
🥓🧀 Ham & Cheese Biscuit Sliders
🌟 Introduction
Ham & Cheese Biscuit Sliders are one of those wonderfully simple recipes that turn a few everyday ingredients into something incredibly comforting. Soft, flaky biscuits are split open and filled with savory ham and melted cheese, then brushed with a delicious buttery topping before being baked until golden and bubbling.
They are perfect for busy mornings, game-day gatherings, potlucks, holidays, lunchboxes, or a cozy weekend breakfast. You can prepare the sliders ahead of time, bake them when needed, and easily customize them with different cheeses, meats, or seasonings.
The combination of warm biscuit, salty ham, gooey cheese, and seasoned butter makes every bite irresistible!
🛒 Ingredients
For the Sliders
- 12 soft biscuits, homemade or refrigerated
- 12–16 slices deli ham
- 8 slices Swiss cheese
- 8 slices cheddar cheese
- 2 tablespoons mayonnaise, optional
- 1 tablespoon Dijon mustard, optional
🧈 For the Buttery Topping
- 4 tablespoons butter, melted
- 1 tablespoon Dijon mustard
- 1 tablespoon honey
- 1 teaspoon Worcestershire sauce
- ½ teaspoon garlic powder
- ½ teaspoon onion powder
- 1 teaspoon dried parsley
- ½ teaspoon poppy seeds, optional
- Pinch of salt
- Pinch of black pepper
Optional Additions
- Sliced green onions
- Pickle slices
- Jalapeño slices
- Turkey instead of some of the ham
- Pepper Jack cheese
- Provolone cheese
- Mozzarella cheese
- Caramelized onions
👩🍳 Instructions
Step 1: Prepare the Oven
Preheat your oven to 350°F (175°C).
Lightly grease a 9 × 13-inch baking dish.
Step 2: Prepare the Biscuits
If you’re using refrigerated biscuits, bake them according to the package directions until they are just cooked through and lightly golden.
Allow them to cool enough to handle.
Carefully slice each biscuit horizontally, creating a top and bottom.
If using homemade biscuits, allow them to cool slightly before slicing.
Step 3: Make the Butter Sauce
Melt the butter in a small bowl.
Whisk in:
- Dijon mustard
- Honey
- Worcestershire sauce
- Garlic powder
- Onion powder
- Parsley
- Poppy seeds
- Salt
- Black pepper
Mix until smooth and fragrant.
This buttery mixture is what gives the sliders their golden crust and incredible flavor.
Step 4: Assemble the Sliders
Place the bottom halves of the biscuits into the prepared baking dish.
Spread a thin layer of mayonnaise and/or Dijon mustard over the biscuit bottoms if desired.
Layer the ham evenly over the biscuits.
Add the cheese on top of the ham.
For extra cheesiness, use a combination such as Swiss + cheddar.
Place the biscuit tops over the cheese.
Step 5: Add the Butter Topping
Generously brush the seasoned butter mixture over the tops of all the biscuits.
Make sure the butter reaches the edges so the biscuits become beautifully golden while baking.
Pour any remaining butter gently over the sliders.
Step 6: Bake
Cover the baking dish loosely with aluminum foil.
Bake for approximately 15 minutes.
Remove the foil and continue baking for another 5–10 minutes, or until:
- The cheese is completely melted
- The ham is hot
- The biscuit tops are golden
- The edges are slightly crisp
For an extra-golden finish, you can broil for about 1–2 minutes, watching carefully so they don’t burn.
Step 7: Rest and Serve
Remove the sliders from the oven and let them rest for about 5 minutes.
Cut between the biscuits and serve warm.
The cheese should be wonderfully melted and stretchy, while the tops should have a delicious buttery crunch.
🍳 Cooking Method
The magic of these sliders comes from baking everything together in one dish.
Instead of individually preparing every sandwich, you assemble the biscuits as one large batch. The heat warms the ham, melts the cheese, and allows the seasoned butter to soak into the biscuits.
The short covered baking period helps prevent the biscuits from becoming too dark while the cheese melts. Removing the foil at the end gives the tops that beautiful golden finish.
📜 A Little History
Ham and cheese sandwiches have been popular for generations because the combination is simple, affordable, and incredibly versatile. Ham paired with cheese appears in many traditional sandwiches around the world, while biscuits became a beloved staple of American home cooking, particularly in the Southern United States.
The slider-style format became especially popular for gatherings because small sandwiches are easy to assemble in batches and serve to a crowd.
Ham-and-cheese sliders combine these traditions into one convenient baked dish: soft bread, savory ham, melted cheese, and a flavorful butter topping.
✨ Formation & Presentation
For a beautiful presentation:
- Arrange all 12 biscuits tightly together in the baking dish.
- Keep the ham and cheese evenly distributed.
- Brush every biscuit top with the butter mixture.
- Bake until golden.
- Sprinkle with a little fresh parsley after baking.
- Serve directly from the baking dish.
For parties, you can place the entire baking dish on the table and allow everyone to pull apart their own slider.
💡 Helpful Tips
🧀 Use More Than One Cheese
Don’t be afraid to combine cheeses.
Swiss + cheddar gives you a classic flavor, while cheddar + Pepper Jack creates a little heat.
🥓 Don’t Overstuff
A generous amount of ham and cheese is delicious, but too much filling can make the sliders difficult to eat and prevent the cheese from melting evenly.
🧈 Don’t Skip the Butter
The seasoned butter topping is one of the best parts of this recipe. It adds flavor while helping the biscuit tops become beautifully golden.
🌶️ Make Them Spicy
Add sliced jalapeños or use Pepper Jack cheese.
🍯 Try a Sweet-Savory Version
Increase the honey slightly and use smoked ham with Swiss cheese for a delicious sweet-and-savory combination.
🥗 What to Serve With Ham & Cheese Biscuit Sliders
These sliders pair beautifully with:
- Scrambled eggs
- Hash browns
- Breakfast potatoes
- Fresh fruit
- Green salad
- Potato salad
- Coleslaw
- Tomato soup
- Pickles
- Roasted vegetables
For breakfast, serve them with eggs and crispy potatoes.
For lunch or dinner, pair them with a fresh salad or bowl of soup.
❄️ Make-Ahead Method
You can assemble the sliders several hours ahead of time.
Prepare the sandwiches, place them in the baking dish, cover tightly, and refrigerate.
When you’re ready to bake, brush them with the butter mixture and place them in the oven.
If they’re going directly from the refrigerator into the oven, they may need a few additional minutes of baking time.
🧊 Storage
Store leftover sliders in an airtight container in the refrigerator for up to 3–4 days.
Reheat them in:
- A 350°F oven for about 8–12 minutes
- An air fryer until warmed through
- A microwave for a quick option
The oven or air fryer will give you the best texture.
❤️ Why Everyone Loves Them
These sliders are loved because they are:
✔ Cheesy
✔ Buttery
✔ Savory
✔ Easy to make
✔ Budget-friendly
✔ Great for parties
✔ Perfect for breakfast or lunch
✔ Easy to customize
✔ Wonderful for leftovers
They also make an excellent recipe for feeding a hungry family without spending hours in the kitchen.
🏆 Conclusion
Ham & Cheese Biscuit Sliders are the perfect example of comfort food made easy. Tender biscuits, savory ham, gooey melted cheese, and a golden seasoned-butter topping come together to create a dish that’s incredibly satisfying without requiring complicated cooking techniques.
Whether you’re preparing breakfast for your family, bringing food to a party, hosting a holiday brunch, or simply craving something warm and cheesy, these little sliders are sure to disappear quickly.
🥓🧀 Make a big batch, serve them warm, and watch everyone reach for seconds!
❤️ If you love easy, cheesy comfort-food recipes, save this recipe and share it with someone who would enjoy it!