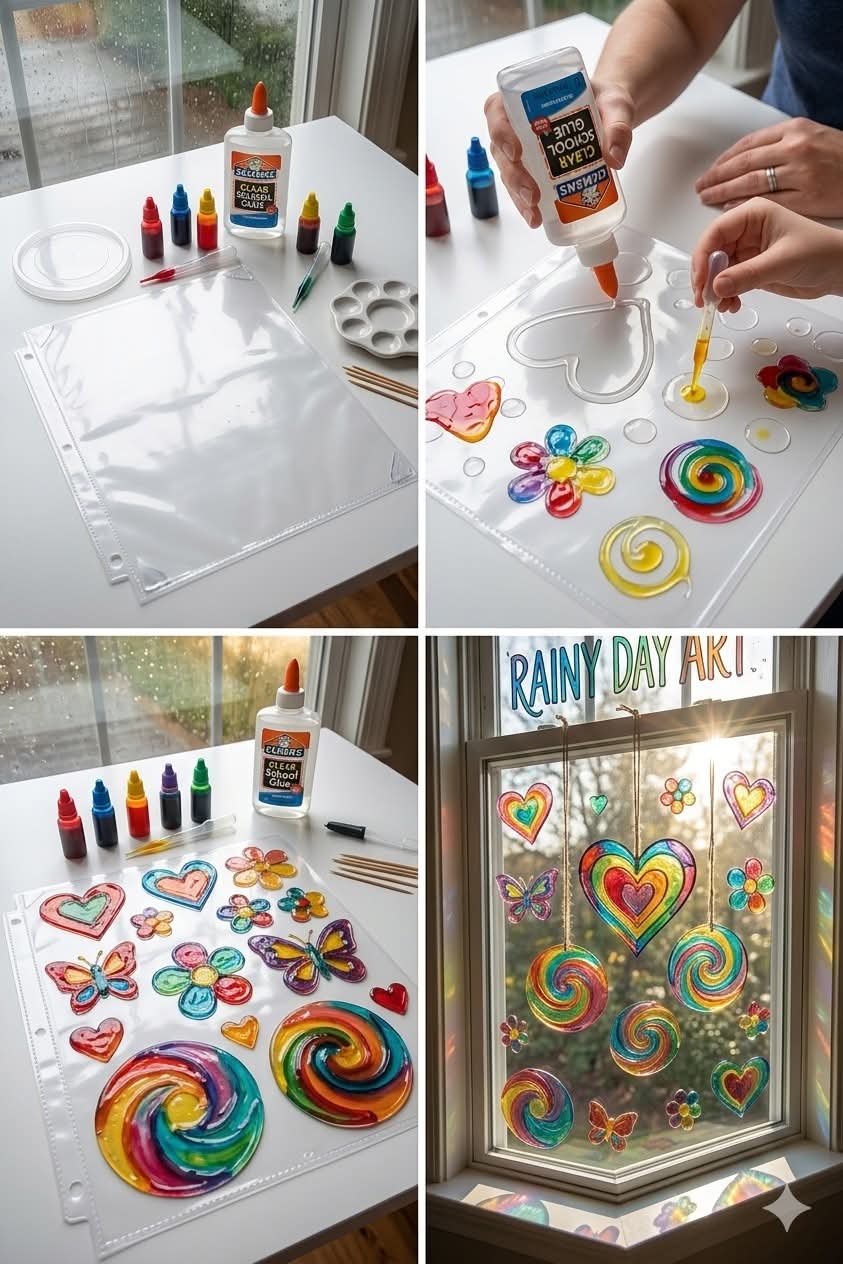
Stained Glass Glue Window Art
A magical, light-catching craft that turns simple glue and color into faux stained glass! This is the kind of rainy-day activity kids get completely absorbed in—mixing colors, tracing shapes, and watching their artwork glow in the window once it dries. It’s wonderfully hands-on, a little delightfully messy, and the final result looks far more impressive than the effort required.
This craft mimics the look of traditional stained glass you might see in places like the or the , but using everyday household materials that are safe and fun for children.
🧴 Ingredients (Supplies You’ll Need)
- White school glue (PVA glue)
- Clear plastic sheet protector, plastic wrap, or zip-top bag
- Black glue (store-bought or DIY with glue + black paint)
- Food coloring or liquid watercolors
- Small cups or bowls for mixing
- Toothpicks or craft sticks
- Printed coloring pages or simple line drawings
- Tape
- Paintbrush (optional)
- Glitter (optional, for sparkle)
🧪 Preparation (Formation of the “Glass Paint”)
- Pour white glue into small cups.
- Add a few drops of food coloring to each cup.
- Stir gently with a toothpick or stick until fully blended.
- Repeat for as many colors as you like.
- If making black outline glue: mix black acrylic paint into glue until deep black.
You now have translucent “glass paint”!
✍️ Instructions (Step-by-Step Method)
Step 1: Set Up Your Design
- Place a coloring page or simple drawing inside a sheet protector or under plastic wrap.
- Tape it flat to the table so it doesn’t move.
Step 2: Trace the Outline
- Using black glue, carefully trace all the lines of the design.
- This acts like the lead lines in real stained glass.
- Let the outline dry for 1–2 hours until slightly raised and set.
Step 3: Fill with Color
- Use your colored glue to fill in each section.
- Spread gently with a toothpick to reach the edges.
- Avoid overfilling—thick puddles take much longer to dry.
Step 4: Add Sparkle (Optional)
- Sprinkle a tiny bit of glitter into wet sections.
Step 5: Dry Completely
- Leave flat to dry overnight (8–12 hours).
- The glue will dry clear, glossy, and flexible.
Step 6: Peel and Display
- Carefully peel the dried art from the plastic.
- Stick it to a window—the natural tackiness helps it cling!
🧠 Methods & Tips for Best Results
- Simple, bold designs work best (butterflies, hearts, flowers, stars).
- If bubbles form, pop them with a toothpick.
- Thinner layers dry faster and look more like glass.
- Works best on sunny windows where light can shine through.
- Store pieces on plastic if you want to reuse them later.
🏛️ A Little History of Stained Glass Inspiration
Real stained glass dates back to the Middle Ages, decorating grand churches and buildings across Europe. Artisans used colored glass pieces joined by lead strips to tell stories through light and color. Famous examples can be admired in places like . This craft is a child-friendly way to recreate that luminous beauty with modern, safe materials.
❤️ Why Kids (and Adults) Love This Craft
- Feels like painting with magic glass paint
- Encourages patience and creativity
- Builds fine motor skills
- Instant “wow” factor when sunlight hits the window
- Beautiful homemade decorations or gifts
🎉 Conclusion
Stained Glass Glue Window Art is simple to prepare, inexpensive, and incredibly rewarding. With just glue, color, and a little imagination, you can transform an ordinary afternoon into a glowing gallery of window art. It’s a craft that blends creativity, history-inspired beauty, and hands-on fun into one unforgettable activity.
Once the sun shines through their artwork, kids feel like true artists—and that pride is the best part of all.