Easy Bread in a Bag Recipe – Fun, Hands-On Baking for All Ages
Making homemade bread doesn’t have to involve a stand mixer, kneading on a floured surface, or long rise times. With this Easy Bread in a Bag Recipe, you can make delicious, soft, and fluffy bread using just a plastic zip-top bag and a few pantry staples. It’s mess-free, beginner-friendly, and perfect for kids or classrooms, making it an educational and tasty activity everyone will love.
Whether you’re teaching little ones the basics of baking or just looking for a quick way to make homemade bread, this bread in a bag technique is fast, fun, and foolproof.
🍞 Why You’ll Love This Bread in a Bag Recipe
✅ No mess – no bowls or stand mixers required
✅ Ready in under an hour
✅ Kid-safe and perfect for group baking projects
✅ Customizable with herbs, cheese, cinnamon, or seeds
✅ Soft, golden crust with a tender interior
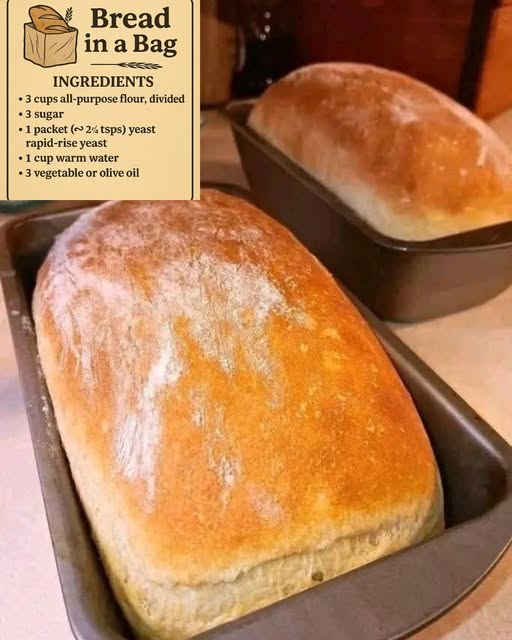
🛒 Ingredients – Pantry Staples for Homemade Bread
This recipe makes 1 small loaf (double for more!).
| Ingredient | Amount |
|---|---|
| All-purpose flour | 3 cups (divided) |
| Warm water (110°F) | 1 cup |
| Granulated sugar | 3 tablespoons |
| Active dry yeast | 1 packet (2¼ tsp) |
| Vegetable oil | 3 tablespoons |
| Salt | 1 teaspoon |
✅ Optional Add-ins: Dried herbs, shredded cheese, garlic powder, cinnamon sugar, raisins
🥣 How to Make Bread in a Bag – Step-by-Step Instructions
✅ Step 1: Mix the Dough (Right in the Bag)
- Use a large, gallon-size zip-top bag.
- Add into the bag:
- 1 cup of flour
- 3 tablespoons sugar
- 1 packet active dry yeast
- 1 cup warm water (around 110°F)
- Seal the bag and squish the ingredients together with your hands for 1–2 minutes, until mixed.
🕒 Let the mixture sit for 10 minutes to activate the yeast. The bag will puff up slightly – that’s a good sign!
✅ Step 2: Add Remaining Ingredients
- Open the bag and add:
- 3 tablespoons vegetable oil
- 1 teaspoon salt
- 1 cup of flour
- Seal the bag again and squish to combine for 1–2 minutes.
- Add the final 1 cup of flour, seal, and knead until a dough forms and no dry flour remains (about 5 minutes).
✋ Pro Tip: If the dough gets too stiff, finish kneading outside the bag on a lightly floured surface.
✅ Step 3: Let It Rise
- Remove the dough from the bag and place in a lightly greased bowl.
- Cover with a towel and let it rise in a warm spot for 30 minutes, or until doubled in size.
✅ Step 4: Shape & Bake
- Punch down the dough and shape it into a loaf or small rolls.
- Place on a greased baking sheet or in a greased loaf pan.
- Let rest while oven preheats to 375°F (190°C).
- Bake for 25–30 minutes, or until golden brown and hollow-sounding when tapped.
🧈 Serving Suggestions – Enjoy Fresh & Warm
- Slice and serve with butter or jam
- Use for sandwiches or toast
- Pair with soups, stews, or chili
- Turn leftovers into French toast or croutons
🧄 For garlic bread, brush with melted butter and sprinkle with garlic powder and parsley before baking.
🥖 Tips and Variations
- Make it sweet: Add 1 tsp cinnamon and ¼ cup raisins or chocolate chips
- Make it savory: Add 1 tsp Italian seasoning or shredded cheddar
- Make rolls: Divide dough into 8 pieces, shape into balls, and bake for 20 minutes
- Gluten-free: Use a 1:1 gluten-free flour substitute (results may vary slightly)
❄️ Storage and Freezing
- Room Temp: Store cooled bread in an airtight bag for up to 3 days.
- Freezer: Wrap tightly and freeze for up to 2 months. Thaw at room temp or toast from frozen.
🧒🏼 Why It’s Great for Kids and Classrooms
Bread in a bag is more than just baking—it’s a hands-on learning experience. It teaches kids about science (yeast rising), math (measuring), and patience (waiting for dough to rise). Plus, the zip-top bag keeps mess to a minimum, making cleanup easy and stress-free.
Perfect for:
- Homeschool activities
- Classroom baking days
- Scouting or summer camp projects
- Rainy day kitchen fun
❤️ Final Thoughts – Homemade Bread Made Fun & Easy
This Easy Bread in a Bag Recipe proves that making homemade bread doesn’t have to be intimidating or messy. With minimal ingredients and maximum fun, it’s a great way to introduce kids or beginners to the joys of baking. Whether you’re looking for a new kitchen activity, a creative educational project, or just a simple loaf of bread that tastes amazing, this recipe delivers every time.
Enjoy your warm, fluffy loaf straight from the oven—no mixer, no mess, just delicious homemade bread!