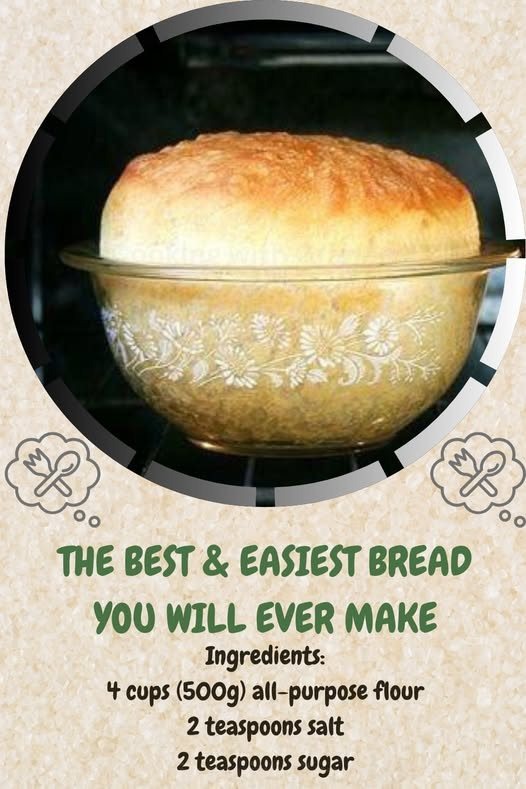
My Mother’s Peasant Bread: The Best & Easiest Bread You Will Ever Make
Few things are as satisfying as baking your own bread — especially when the recipe is as simple, forgiving, and deliciously foolproof as this one. My Mother’s Peasant Bread is not just any homemade loaf; it’s the kind of bread that’s crispy on the outside, tender and airy on the inside, and so easy that even first-time bakers will have instant success.
This rustic loaf requires no kneading, no fancy equipment, and minimal ingredients. It’s the perfect beginner’s bread, but the result is so impressive, even seasoned bakers return to it again and again.
Let’s explore how this classic, homemade peasant bread became a staple in so many homes — and how you can make it today with just five simple ingredients.
Why This Peasant Bread Is the Best Bread You’ll Ever Make
✅ Ridiculously Easy
No mixer, no kneading, no complicated shaping. This is truly a mix, rise, and bake kind of recipe.
✅ Perfect Texture
The crust bakes up golden and crisp, while the inside stays soft, airy, and slightly chewy — everything you want from a hearty loaf.
✅ Minimal Ingredients
You likely have everything you need already in your kitchen: flour, water, yeast, sugar, salt.
✅ Versatile and Adaptable
Serve it with soups, stews, salads, or pasta — or toast it with butter and jam for breakfast.
Simple Ingredients (Makes 2 Small Loaves)
- 4 cups (500g) all-purpose flour
- 2 teaspoons salt
- 2 teaspoons sugar
- 2¼ teaspoons (1 packet) instant yeast
- 2 cups (475ml) warm water (about 110°F / 43°C)
Optional Add-Ins: Fresh herbs, garlic powder, shredded cheese, or seeds can be added to the dough for extra flavor.
Step-by-Step Instructions
Step 1: Mix the Dough
In a large mixing bowl, combine:
- Flour,
- Salt,
- Sugar, and
- Instant yeast.
Pour in the warm water and stir until you get a shaggy, sticky dough. No kneading necessary — just mix with a spoon or spatula until fully combined.
Step 2: First Rise
Cover the bowl loosely with a clean towel or plastic wrap and let the dough rise at room temperature for 1.5 to 2 hours, or until it has doubled in size and appears bubbly on top.
Tip: For a faster rise, place the bowl in a warm spot, like an oven with the light on or near a sunny window.
Step 3: Prepare the Baking Bowls
Lightly grease two oven-safe bowls (1-quart size) with butter or oil. This recipe is traditionally baked in Pyrex glass bowls, but metal or ceramic bowls work too.
Why bowls? The curved shape gives the bread its signature round, domed appearance and encourages a beautifully crisp crust.
Step 4: Shape the Dough
Using two forks, gently deflate the dough in the bowl and scrape it away from the sides.
Divide the dough into two equal portions, and plop each half into a prepared bowl. Don’t worry about shaping — it will settle and rise on its own.
Step 5: Second Rise
Let the dough rise in the bowls for another 30–40 minutes, or until it has risen slightly over the rim of the bowls.
Meanwhile, preheat your oven to 425°F (220°C).
Step 6: Bake
Place both bowls on the middle rack of the oven and bake for 30–35 minutes, or until the tops are deep golden brown and crisp.
To test for doneness, tap the top of the loaf — it should sound hollow.
Step 7: Cool and Enjoy
Remove the bowls from the oven. Let the bread cool in the bowls for 5–10 minutes, then turn the loaves out onto a wire rack.
Let cool for at least 15 minutes before slicing — though good luck waiting that long with the incredible smell wafting through your kitchen.
What to Serve with Peasant Bread
This bread is the ultimate sidekick for countless dishes:
- Hearty soups and stews (like beef stew, lentil soup, or chicken noodle)
- Salads (especially Caesar or Greek salads)
- Pasta dishes with marinara or Alfredo
- As toast with butter, jam, or avocado
- For sandwiches or paninis — it holds up beautifully to fillings
Storage Tips
- Room Temperature: Store cooled bread in a bread box or wrapped in a kitchen towel for up to 3 days.
- Freezer: Wrap loaves in foil and place in a zip-top bag. Freeze for up to 2 months.
- To Reheat: Warm in a 350°F (175°C) oven for 10–12 minutes to refresh the crust.
Recipe Tips for Success
- Use Instant or Rapid-Rise Yeast — no need to proof it separately.
- Don’t overthink the dough — it’s meant to be sticky and rustic.
- Use butter to grease the bowls for extra flavor and a crispier crust.
- For a crisper bottom crust, remove bread from the bowl after baking and place directly on the oven rack for 3–5 more minutes.
Make It Your Own: Flavor Variations
Elevate your basic peasant bread with these easy upgrades:
- Garlic Herb Bread: Add 1 tsp garlic powder + 1 tbsp chopped rosemary or thyme
- Cheddar Jalapeño: Stir in ½ cup shredded cheddar and 1 small chopped jalapeño
- Seeded Loaf: Sprinkle sesame seeds or poppy seeds on top before baking
- Olive & Feta: Fold in ½ cup chopped olives and ¼ cup crumbled feta for a Mediterranean twist
Final Thoughts: Your Go-To Homemade Bread
My Mother’s Peasant Bread is proof that bread-making doesn’t have to be complicated to be spectacular. With just a few ingredients and a bit of patience, you’ll be rewarded with a golden, crusty, and irresistibly fluffy loaf that’s good enough to serve at any meal — or enjoy all on its own.
Once you make this once, you’ll never look at store-bought bread the same way again. It’s more than a recipe — it’s a tradition, a comfort, and a reminder that the best food often comes from the simplest ingredients.