Nun’s Puffs (Pets de Nonne): A Heavenly Pastry with a Storied Past
Few pastries capture the imagination and delight of bakers quite like Nun’s Puffs, also known by their original French name, “pets de nonne,” which playfully translates to “nun’s farts.” Despite the humorous name, these light, airy confections have a noble history dating back to medieval French monasteries. Made with a simple pâte à choux dough—used in éclairs, profiteroles, and cream puffs—Nun’s Puffs puff up magically in the oven, resulting in a treat that is both crispy and soft, simple yet irresistible.
What Are Nun’s Puffs?
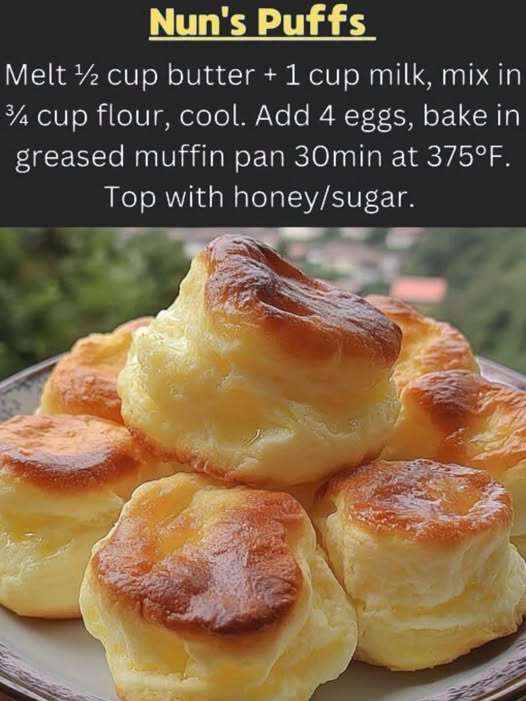
Nun’s Puffs are small, hollow, pastry puffs made from choux pastry and baked in muffin tins to create a uniquely crisp texture outside and a soft, cloud-like interior. Traditionally served warm and dusted with sugar, these pastries are sometimes drizzled with honey for added sweetness. Their ethereal quality and comforting flavor make them a timeless dessert or breakfast treat.
Ingredients for Classic Nun’s Puffs
Crafting Nun’s Puffs requires only a handful of ingredients, most of which are likely already in your pantry. This makes them an accessible option for home bakers of all skill levels.
🧂 Ingredients List
- ½ cup (1 stick) unsalted butter
- 1 cup whole milk
- ¾ cup all-purpose flour
- 4 large eggs
- ½ to 1 tablespoon granulated sugar (optional)
- Extra granulated sugar for topping
- Honey for drizzling (optional)
Step-by-Step Recipe for Perfect Nun’s Puffs
🔥 1. Preheat and Prep Your Tin
Set your oven to 375°F (190°C). Grease a 12-cup muffin tin generously—make sure to get into the corners and rims to prevent sticking. These puffs rise dramatically, so a nonstick, well-greased surface is essential.
🍳 2. Make the Dough Base (Pâte à Choux)
In a medium saucepan over medium heat:
- Melt the butter until fully liquified.
- Add the milk and bring it to a gentle boil.
- Quickly stir in all the flour at once, using a wooden spoon.
- Continue stirring vigorously until the mixture forms a smooth, cohesive ball that pulls away from the sides of the pan.
Remove from heat and allow the mixture to cool for 5 minutes. This ensures the eggs won’t scramble when added.
🥚 3. Add the Eggs One at a Time
Add the eggs individually, beating thoroughly after each addition. The dough may look lumpy or separated at first—keep stirring! It will transform into a smooth, glossy, and thick batter that resembles a stiff muffin mixture.
For best results, use a hand mixer or stand mixer with a paddle attachment if you find mixing by hand too strenuous.
🧁 4. Fill the Muffin Cups
Spoon the dough into your greased muffin tin, filling each cup about two-thirds full. The batter is sticky, so use two spoons or a small scoop for neater results.
Sprinkle each mound with a pinch of sugar to add sweetness and help with caramelization during baking.
🔥 5. Bake Until Golden and Puffy
Bake the Nun’s Puffs for 30 to 35 minutes, or until they have risen impressively, developed a deep golden color, and feature a craggy, crispy top. Avoid opening the oven early—like all choux pastries, they need a stable heat environment to fully rise and hollow out.
🍯 6. Serve Warm and Sweet
Transfer the puffs to a wire rack immediately after baking to avoid sogginess. Serve them warm, either:
- Sprinkled with additional sugar
- Drizzled with honey
- Or filled with whipped cream or jam
Their hollow center makes them perfect for creative fillings or dips.
Baking Tips for Success
✅ Don’t Rush the Cooling Step
Letting the dough cool before adding eggs is crucial. Hot dough can cook the eggs, resulting in scrambled bits instead of a smooth batter.
✅ Use Room Temperature Eggs
This helps them incorporate more easily and results in a more cohesive batter.
✅ Avoid Overbaking
Keep an eye on the color and rise. A deep golden-brown color ensures the interior has dried enough to prevent collapse, but don’t let them burn.
Flavor Variations to Try
🍓 Berry Bliss Puffs
Fill the puffs with fresh whipped cream and top with strawberries or raspberries for a summery treat.
🍫 Chocolate-Dipped Nun’s Puffs
Drizzle with melted dark or milk chocolate and a sprinkle of sea salt for an elevated dessert.
🍋 Lemon Glaze Option
Drizzle with a light lemon glaze made from powdered sugar and lemon juice for a tangy finish.
Serving Suggestions
- Breakfast Pastry: Serve alongside fresh fruit and coffee.
- Dessert Platter: Pair with custard, whipped cream, or fruit preserves.
- Afternoon Tea: Add to a tiered tea tray for an elegant touch.
These versatile pastries shine on any occasion.
Storage and Reheating Instructions
While Nun’s Puffs are best freshly baked, you can store leftovers in an airtight container at room temperature for up to 2 days. To enjoy them again:
- Reheat in a 350°F (175°C) oven for 5–7 minutes to revive their crisp texture.
- Avoid microwaving, which softens the crust.
You can also freeze unbaked batter in a piping bag or container for up to one month. Thaw overnight in the fridge and bake as needed.
A Pastry with History and Heart
The charm of Nun’s Puffs lies not just in their flavor or texture, but in their heritage. With roots in European monastic kitchens, these pastries were once considered a special treat, made with care and few ingredients. Today, they bring the same joy and indulgence to modern kitchens.
Whether you’re looking to explore traditional baking or just need a new favorite dessert, Nun’s Puffs are a light, delightful, and easy-to-master pastry that delivers every time.